Wednesday, April 2, 2014

Finally an update!

Well after not making any posts for a while i'm back! first up I found a bunch of my old games and consoles in my moms attic. I found my old PS1 with screen so I decided to make it look better since the plastic had faded and was scratched up.


I used a two step paint on this, A metallic silver basecoat with a transparent red. I think it came out great! 
I also did this controller shell with the two step paint.

Next up I found all my old Gameboy games which is awesome because I had been looking for them for a good while now.

Including all my Pokemon games(for gameboy I never lost my DS/3DS games)

Remember the Xbox slim I did for my wife? well it now has a Talismoon whisper slim fan in it. Decided to go with the blue LEDs in the fan for now until I change the ROL leds to red then I will change the fan LED's to red. I also modded the fan from a 5v to a 12v power source so it moves a lot more hot air.


My buddy Dylon wanted his controller fixed up so I used a metallic red over the black shell to give it a darker look, Also added clear thumb sticks and buttons along with new grips on the thumb sticks.

Also a few new controllers I've painted.

And last but not least! My wireless mouse that I use at work.


I used 3 types of paint on this. I did the trim in red with a black basecoat and on top of the black I used a clear coat that has metallic rainbow flake. Its really hard to get a picture of it but when the sun hits it, it looks amazing!

Well thats all for now. I will try to post more often as I still see this blog gets a pretty good amount of views each day. So be on the look out as I will have another post soon!

Monday, October 28, 2013

Wifes Xbox slim.

This post will be a quick one but I wanted to show off the Xbox slim that I did for my wife.


Got the Xbox for free from a friend. The laser went bad so I replaced it and now it works like new. I put a Vault exo case on it with controller holder, window with metallic red painted dvd drive and purple LED's around the fan.

Tuesday, September 24, 2013

Controllers Pt.2

Well it has been a while since I have made a post, but I have been busy working on more controllers. 

The first one is my wired controller.


I have added new rubber grips to it, a new clear blue top shell and some paint to the buttons and thumb sticks. 

Next is a shell that I painted gold. 


ended up painting a old wireless mouse that I had to match.


Added pink SMD's to the ring of light around the home button.


Next I started to add led's 


Added red and green SMD's to the ring of light.


Leds with blue trim.


A controller I did for my younger brother.


A few of the controllers I've put led's in.

A group shot of most of the controllers I've modded.


This one is not finished but its looking nice.


And finally my pride and joy! Its a deep metallic red with a thick layer of clear coat so it will shine!


you can somewhat see the metal flakes in this picture.


well that is all for now I will be updating this again as much as I can.

Tuesday, May 28, 2013

Yet another Xbox

Hello again. I've finished up another Xbox so it was time to post it on here.

This Xbox had a bad laser in it so I bought a replacement laser for the BenQ drive installed it and had it working like new, so I decided to mod the case. 


I decided to go with a Army theme since here lately I've been big into Battlefield 3. I drew a grenade on the case and started cutting.


After it was cut out I needed to file it down, and let me tell you that was a lot of filing! After I had it all filed down the next step would be paint. Olive drab was going to be my first choice but I was all out so I went with flat black since that goes well with anything.


This picture shows how it will look with LED's in it. 

Now usually after paint I would add a window to show off the inside but since I painted the DVD drive and the fan shroud flat black there is not much to show off so I decided to do something a little different.


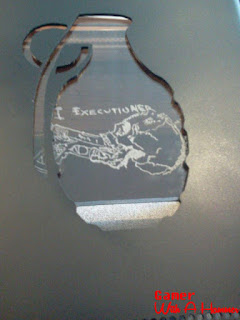
An etching! this was my first shot at doing a etching but it was actually quite easy. If you can trace you can etch(plus its on plexi-glass so no worries about it breaking) the above picture was a test run on a spare piece of plexi. If your wondering what the picture is, Its a dogtag from Battlefield 3 that you can unlock in game.


After I cut a new piece of plexi-glass I etched the same thing on it and stuck it in the case and hot glued it down.


Then came time to choose the LED color that I would go with.

I have a bunch of LED colors: red, green, blue, white, yellow(more of a amber color), pink and purple(UV).

I tried them all out to see which was best.


First was green.(shows up really bright with only one LED) All of the pictures to come were using one LED to light it up so its not very bright.


Yellow(didn't show up very good at all)


Pink. It came out purple in the picture but in person its very pink.


Red. Didn't show up very red in the picture.


And last is white. (I didnt snap a picture of the blue but it was very dim)

To keep with the Army/Battlefield 3 theme I went with the green(plus it was the brightest and wouldn't use as many LED's to light it)


After the LED's went in it turned out great! 


Now I didn't wire the LED's to the motherboard like I usually do since I had no reason to take it apart that much, so I added a battery pack inside the console and put a switch on the outside so I can turn it on and off when needed. The face plate is now black like the case, and the hard drive that is on it is from my other Xbox so I will be modding one with custom window to match this case.

Once I start modding that HDD I'll post that up for everyone to see.

After fixing this Xbox 360 I have now fixed 5 all together, so that means I have 5 Xbox 360 phat's and my Xbox 360 slim which now looks like this:


A Battlefield 4 skin. Cannot wait for Battlefield 4 to come out!